

In this article
- Before and after: a letter in dozens of pieces
- Step 1: Gather and protect every fragment
- Step 2: Sort the pieces before you scan
- Step 3: Scan the fragments at high resolution
- Step 4: Reassemble the letter digitally
- Step 5: Handle the missing pieces honestly
- Keep the original fragments
- When to bring in a professional conservator
The safest way to put a torn letter back together is to do it digitally. Lay every fragment flat, scan them all in colour at 600 DPI, and use an AI reconstruction tool to match the pieces by their tear edges, the flow of the handwriting and the colour of the ink. Any gaps left by missing fragments can then be filled with matching paper texture, and the original pieces never have to touch tape or glue.
This guide is written for letters that have been torn into many small pieces, the kind of damage that turns a single page into a jigsaw puzzle with no picture on the box. It might be a love letter ripped up in anger years ago, a wartime letter that slowly came apart in a shoebox, or a page that a pet or a toddler got hold of. If your document has only a single tear or one missing corner, you'll get a quicker result by following our guide on how to restore a torn document instead.
Before and after: a letter in dozens of pieces
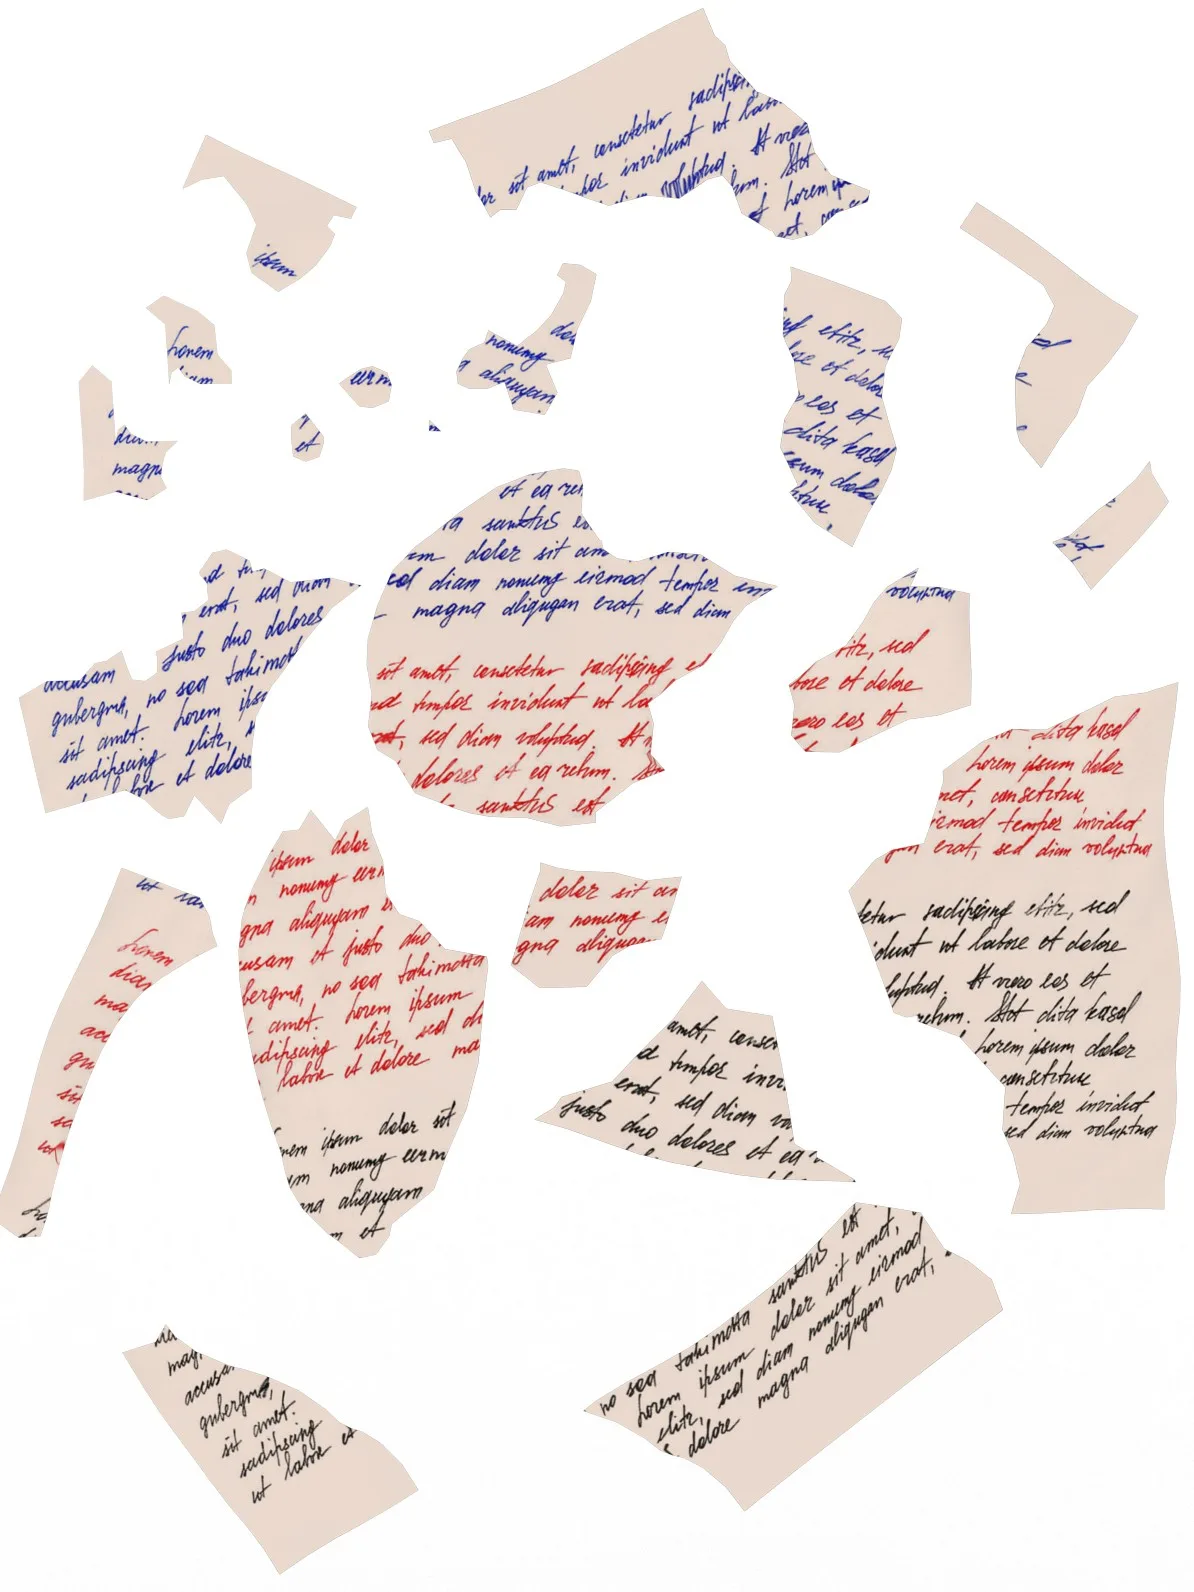
Before: a handwritten page torn into dozens of fragments, some missing entirely.
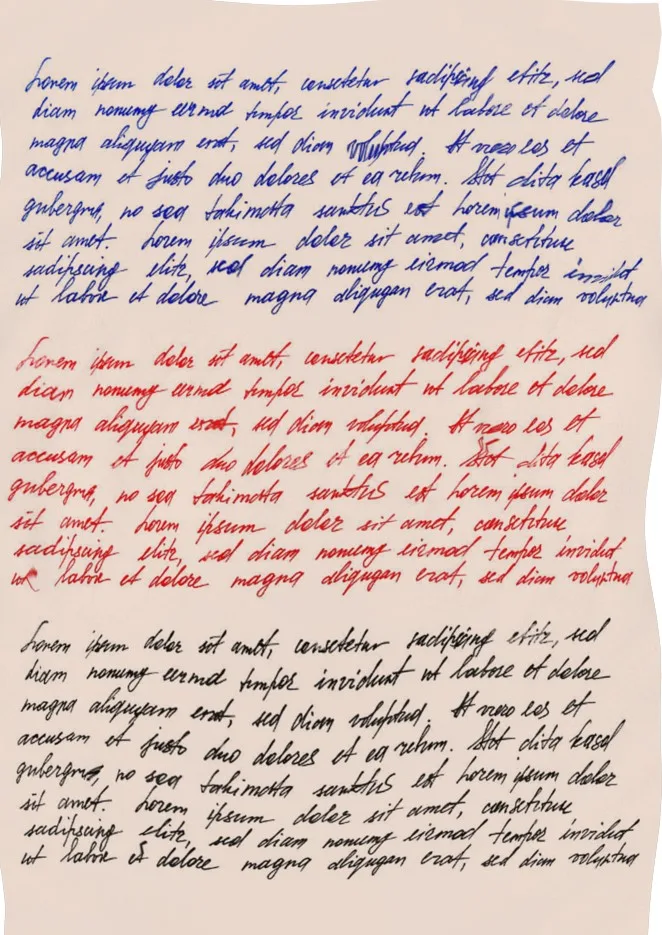
After: the fragments reassembled into a complete page, with the gaps filled to match the paper.
Step 1: Gather and protect every fragment
Start by collecting every piece you can find, no matter how small. It's tempting to ignore the tiny scraps, but they often carry the exact edge that links two larger pieces together, and losing one can leave a gap that splits a word or a whole line in half. Check the envelope the letter came in, the bottom of the drawer or box it was kept in, and the folds of anything stored alongside it.
Handle the fragments as little as possible, and only with clean, dry hands. Torn edges are the most fragile part of the paper, and they're also the most important clue for matching pieces, so every time an edge frays or curls the puzzle gets a little harder. Keep the pieces flat in a clean folder or between sheets of plain paper. Avoid dropping them loose into an envelope, where they slide against each other and slowly wear down.
Most importantly, don't tape, glue or staple anything together, even as a temporary fix. The Library of Congress advises against putting self-adhesive tape, glue or fasteners on any paper document, and for good reason. Adhesives yellow and turn brittle over time, can stain right through the paper, and cover up the very edges a reconstruction depends on. Even so-called invisible tape is difficult to remove later without lifting ink or tearing the paper further.
Step 2: Sort the pieces before you scan
You don't need to solve the puzzle by hand, but ten or fifteen minutes of sorting before you scan makes the digital reconstruction faster and more accurate. Work on a clean, dry table away from fans, open windows and curious pets, because a small fragment can disappear with a single draught. Then sort the pieces in this order:
Edges and corners first. Pieces with a straight, uncut edge came from the outside of the page, and pieces where two straight edges meet are corners. Setting these aside gives you the frame of the letter, in the same way you'd start a jigsaw with its border.
Group by ink colour. Plenty of letter writers switch pens partway through. In the example above, the letter used blue, red and black ink in separate paragraphs, which turned one large puzzle into three much smaller ones. Pencil, faded ink and darker ink can be grouped the same way.
Follow the lines. The slope of the handwriting, any ruled lines on the paper and the direction of the script all show which way up a piece belongs. Once you start looking, a fragment sitting upside down is surprisingly easy to spot.
Check the back. Letterheads, watermarks, folds and writing on the reverse side are all extra clues, especially for pieces that look blank on the front.
If you want to keep track of your groups, put each one on its own labelled sheet of paper. Never write numbers or notes on the fragments themselves.
Step 3: Scan the fragments at high resolution
Scan every fragment face-up at 600 DPI in colour, even if the letter looks black and white to your eye. Colour scans pick up subtle differences in ink and paper tone that help the software tell similar pieces apart. At 600 DPI you also capture the fibres along each torn edge, which is where most of the matching actually happens.
Place the fragments on a plain background that contrasts with the paper. A sheet of black or dark grey card works well behind white or cream stationery, while white card suits darker paper. Leave a small gap between pieces so that no two edges touch or overlap, otherwise the software may read them as a single fragment. If you have more pieces than will fit on the scanner glass, scan them in batches and keep the settings identical each time so the colours stay consistent.
Save your scans as TIFF or PNG files rather than JPEG, since JPEG compression softens the fine detail along the edges. If the letter is written on both sides, scan the back of every fragment as well. Flip each piece where it lies so the layout mirrors the front scan, and name the files clearly in pairs, such as batch1-front and batch1-back. Writing on the reverse side can often confirm a match that looks uncertain from the front.
If some fragments have curled, let them lie as flat as they naturally will and scan with the lid open rather than pressing it down. Forcing curled or brittle paper flat can crack it along old folds.
Step 4: Reassemble the letter digitally
Once your scans are ready, upload them to a reconstruction tool such as Recovoly's torn section repair. The AI studies each fragment individually and then compares it against every other piece at once, something that would take hours to do by hand. It looks at the shape of each tear, checks whether lines of handwriting carry on smoothly from one piece to the next, and matches the colour and texture of both the paper and the ink. Using all of those clues together, it fits the fragments into a single page.
You still have the final say. Before anything is finalised, you can review where each piece has been placed and adjust anything that doesn't look right. It's worth reading the reassembled text slowly at this stage. A sentence that suddenly stops making sense, or a line of writing that jumps up or down halfway across, is usually the quickest sign that two pieces have been swapped.
Step 5: Handle the missing pieces honestly
Very few torn letters survive with every piece intact. Fragments get swept up with the rubbish, lost during a house move, or simply crumble away, so most reconstructions end up with at least a few holes. How you deal with those gaps should depend on what the restored letter is going to be used for.
Option | Best for | What the result looks like |
|---|---|---|
Fill with matching paper texture only | Family letters, framed gifts and display copies, where a complete-looking page matters most | The holes blend into the paper, but no words are added |
Leave gaps visibly marked | Research, legal and archival use, where invented content could mislead | Missing areas are shown plainly, so readers know exactly what survived |
Texture filling is about appearance, not content. It makes the page look whole without adding a single word, which is why it works so well for letters you want to frame or give to a relative.
Some tools, including Recovoly's rebuild lost parts feature, can go a step further and suggest missing words based on the surrounding text. These suggestions can be genuinely helpful when you're trying to work out what a half-finished sentence meant. Just remember they're educated guesses rather than the writer's own words. Keep a note of which parts were reconstructed, and be upfront about it whenever you share the letter, especially for family history, legal or research purposes.
Keep the original fragments
Even after a perfect digital reassembly, hold on to every original piece. The fragments are the letter itself, carrying the writer's real ink, handwriting pressure and paper, while the restored image is a copy of it. Scanning and AI tools also keep improving, so keeping the originals means you can always scan them again in future for an even better result.
Store the pieces flat in an acid-free folder or archival box, somewhere cool, dry and dark. Attics, basements and spots near radiators or sunny windows are best avoided, since heat, damp and light all speed up fading and brittleness. Tuck a printout of the reassembled page inside the folder, along with a short note saying when it was restored and whether any gaps were filled. That way, anyone who finds the folder years from now will understand exactly what they're holding.
Keep at least two copies of the digital files as well, for example one on your computer and one in cloud storage. For more on long-term care, read our guide on how to digitize and preserve historical documents.
When to bring in a professional conservator
Digital reconstruction is the right choice for most family letters, but some documents deserve a professional's hands as well. It's worth contacting a paper conservator if the fragments flake or crumble when touched, show signs of mould or water damage, have stuck together, or are covered in old tape that's starting to discolour.
The same goes for any letter with real historical, legal or financial value. A conservator can stabilise the paper and physically repair the original using reversible, archival methods. To find one near you, the American Institute for Conservation runs a Find a Conservator directory you can search by specialty and location. Once the pieces have been treated, you can still scan them and reassemble a digital copy, so the two approaches work well side by side.
Frequently asked questions
Can a letter torn into many pieces be put back together?
Should I tape the torn pieces back together first?
What if some pieces are missing?
What if the letter is written on both sides?
Someone already taped the pieces together. What should I do?
Related restoration tools

Written by
Thisara Jaso
Document Specialist
A document restoration specialist and historical document researcher passionate about preserving, restoring, and uncovering the stories behind historical manuscripts and archival records.


