

In this article
Almost every family has at least one certificate sitting somewhere it probably shouldn't be. A pilot's first solo certificate in a biscuit tin, a school diploma at the bottom of a wardrobe, a marriage certificate that spent twenty years in a cardboard box in the garage. Paper is patient, but it isn't indestructible, and by the time someone finally takes it out to frame it or show the grandchildren, it usually carries a record of every damp winter it has lived through. Brown rings, little rust-coloured freckles, and a yellow cast that makes the whole thing look tired and older than it really is.
If you only want the short version to restore stained certificate, here it is. Scan the certificate in colour at somewhere between 300 and 600 DPI. Run that scan through an AI restoration tool that can tell the difference between stains, the printed design and the handwriting, and let it rebuild a clean paper background only where the damage actually is. Signatures, seals and borders are kept exactly as they were, while water rings, foxing and spots are removed. Most importantly, the original certificate is never touched at any point. Every bit of the work happens on a digital copy.
The rest of this article follows one real restoration from start to finish. You'll see what the damage looked like, what had to survive the process untouched, how the stains were separated from the parts that matter, and how you can do the same thing at home without making the mistakes that ruin old paper for good.
The certificate: water rings, foxing and spots
The certificate in this case study is a "1st solo flight" certificate, the kind of document a pilot keeps for life because it marks the first time they took an aircraft up with nobody else in the cockpit. It has a printed double-line border, an eagle illustration, typed name and date lines, two handwritten signatures and an embossed-style seal. It had suffered the sort of damage that's typical for documents kept in a drawer or a damp room for decades, and none of it was unusual. That's partly why it makes a good example. If you have an old certificate at home, there's a fair chance it has some mix of the same three problems.
The first and most obvious problem was water tide lines. These are the brown rings you see where moisture once soaked into the paper and then dried. As water evaporates, it doesn't simply vanish evenly. It creeps towards the edge of the wet patch and carries dissolved dirt and broken-down paper fibres with it, so when it finally dries, all of that material is left behind in a darker line. On this certificate the rings ran along the top and through the centre, cutting straight across parts of the design.
The second problem was foxing and spotting. On the right-hand side there were clusters of small dark specks, the reddish-brown freckles that collectors call foxing. Nobody is completely certain what causes foxing in every case, but the usual suspects are mould activity and tiny metal impurities in the paper reacting over time, and both get much worse in humid storage. Whatever the exact cause, the pattern is easy to recognise: it spreads in scattered clusters rather than in one clean mark, which makes it fiddly to remove by hand.
The third problem was general yellowing. Older papers often contain acids that slowly break the fibres down, and exposure to light and warmth speeds that up. The result is a warm, dull cast over the whole sheet. On this certificate it had flattened the contrast of the printed border and taken the crispness out of the eagle illustration, so even the parts that weren't stained looked faded.
In Short:
Water tide lines - brown rings left where moisture dried along the top and centre.
Foxing and spotting - clusters of dark specks on the right-hand side, typical of damp storage.
General yellowing that dulled the printed border and the eagle illustration.
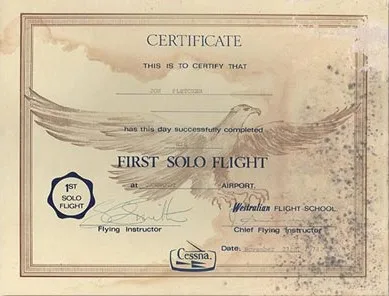
Before: water rings across the top and heavy spotting on the right-hand side.
Why removing stains is easy and removing only the stains is not
The hard part of certificate restoration isn't removing stains. Almost any photo editor can make a stain disappear if you don't mind what else disappears with it. The hard part is removing only the stains, and leaving every line of ink, every printed detail and every bit of handwriting exactly where it was.
The trouble is that stains and ink often live in the same tonal range. A tide line is a band of brown. An old fountain pen signature can also be brown, especially once the ink has aged. Typewriter characters on a certificate from decades ago are rarely a solid black; they're usually a slightly uneven grey, lighter where the ribbon was worn. So when you reach for a brightness slider, a levels adjustment or a one-click "whiten" filter, the software has no idea which brown is damage and which brown is someone's name. It simply lightens everything that falls in that range. The paper gets whiter, but the signatures thin out, the faint tails of the handwriting vanish, and the typed lines start to break up.
The manual alternative is to sit with a healing brush or clone tool and paint the stains out one by one. That can work, but on a document like this it takes hours, and every pass near a fine printed line risks smudging it or leaving a slightly blurred patch that gives the edit away. Foxing is especially painful, because instead of one big mark you're dealing with dozens of tiny ones, often sitting right next to text.
This is also why colour matters so much. To the eye, a stain and an ink stroke can look similar in brightness, but they nearly always differ in colour. Water damage and foxing tend towards yellow and orange-brown, while ink is usually blue-black, grey or a cooler brown. A colour scan keeps that difference. A greyscale scan throws it away and makes the job far harder for any tool, human or automated.
What had to be preserved
Before any restoration starts, it helps to be clear about what must not change. On this certificate, that list was short but every item on it was delicate:
Both handwritten signatures. These are the part of a certificate that people look at first, and the part most easily damaged by heavy-handed editing. A real pen stroke isn't a flat line. It gets thicker and thinner with pressure, it feathers slightly into the paper fibres, and it often trails off in a fine tail at the end of a letter. Lose those details and a signature starts to look printed or traced.
The embossed-style "1st solo flight" seal. Seals like this rely on soft shading to look raised. If a filter flattens the light and dark tones around them, the seal stops looking three-dimensional and starts looking like a sticker.
The typed name and date lines. Typed characters from an old machine are rarely perfect. Some letters strike harder than others and some sit slightly out of line. That unevenness is part of what makes the document look genuine, so the goal was to keep it, not tidy it up.
The fine double-line printed border and the eagle illustration. Thin printed lines are the first thing to break when a healing brush passes over them, and fine hatching in an illustration blurs easily. Both had to come through with every line intact.
The point of writing this list down is that it changes the question you ask. You stop asking "how do I get rid of the stains?" and start asking "how do I get rid of the stains without moving a single pixel of any of these details?" That second question is the one a good restoration has to answer.
How the restoration worked
The process had three stages: a good scan, a careful separation of what was damage and what wasn't, and a rebuild of the paper only where the damage had been. None of it involved the physical certificate beyond laying it on a scanner.
Stage one was the scan. The certificate was scanned in colour, within the 300 to 600 DPI range. That resolution is high enough to capture the fine double-line border, the texture of the paper and the thin ends of the pen strokes, but not so high that the files become unwieldy. Scanning in colour mattered more than anything else at this stage, for the reason covered above: the colour difference between a brown water stain and a dark ink line is often the clearest clue that separates them.
Stage two was classification. Instead of applying one adjustment to the whole image, the restoration model looked at the certificate region by region and sorted what it saw into four broad groups: printed design, handwriting, stain and plain paper. The border, the eagle and the seal fell into printed design. The two signatures fell into handwriting. The tide lines, foxing specks and spots were marked as stains. Everything else was paper. This is the step that a simple whiten filter skips entirely, and it's the reason the signatures and typed text came through unharmed.
The trickiest spots were the places where a stain ran directly across something important, such as a water ring crossing part of the border or a cluster of foxing sitting close to the typed lines. In those areas the model had to treat the ink line and the discolouration behind it as two separate layers. The line stays where it is, at its original weight and colour, while the brown tint around and beneath it is removed.
Stage three was rebuilding the paper. Once the damaged areas were identified, only those areas were reconstructed. The new paper wasn't painted in as flat white, which is a common giveaway of a rushed edit and makes a certificate look like a photocopy. Instead, the background was rebuilt with a natural off-white tone and a subtle paper texture that matches the undamaged parts of the sheet, so the repaired areas blend in rather than standing out as bright patches.
The final step was a human check. Automated restoration is very good at this kind of task, but it still makes sense to zoom in on the signatures, the seal and the corners of the border and compare them against the original scan before calling the job finished.
The result
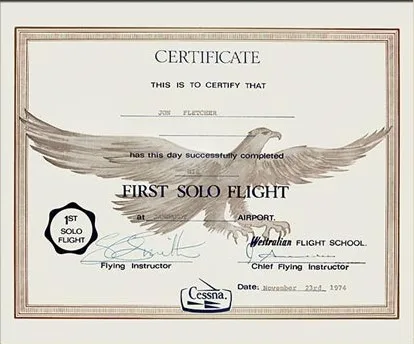
After: the stains and spots are gone. Signatures, seal, border and typed details are unchanged.
The tide lines across the top and centre are gone, and so is the foxing that had gathered on the right-hand side. The yellow cast has been lifted enough that the printed border and the eagle illustration look crisp again, but the paper still reads as paper rather than as a sheet of bright office white. More importantly, the parts that give the certificate its meaning haven't moved. Both signatures keep their natural pressure and their thin trailing strokes. The seal still looks raised. The typed name and date lines still have the slightly uneven character of a real typewriter, and the fine double-line border runs unbroken all the way round.
A good way to judge a restoration like this is to put the before and after side by side and look only at the signatures. If they look identical in both versions, apart from the cleaner paper around them, the restoration has done its job. If the after version looks thinner, sharper or more "digital", something has been over-processed.
The restored certificate is suitable for framing, printing or adding to a family archive. Many people frame a high-quality print of the restored version and keep the original safely stored away, which gives them the best of both: a clean copy on the wall and an original that isn't exposed to light every day. You can see more examples on our certificate restoration page.
How to restore a stained certificate yourself with recovoly
You don't need special equipment to get a result like the one above. A decent flatbed scanner and a restoration tool will do most of the work. What makes the difference is doing each step carefully, because a poor scan or a rushed check can undo the benefit of a good tool.
Scan in colour at 300 DPI or higher. Stains and ink often differ mainly in colour, so don't scan in greyscale, even if the certificate looks mostly black and white. Clean the scanner glass first with a soft dry cloth, because dust shows up as specks that look a lot like foxing. Lay the certificate flat and leave a small margin around the edges so the border isn't cropped. If your scanner software has automatic colour correction, sharpening or "descreen" options, switch them off so you capture the document as it really is. For a certificate with fine lines or very faint handwriting, 600 DPI gives the restoration more to work with.
Save the raw scan before you do anything else. Keep an untouched copy as a lossless TIFF or PNG. This is your digital original. If anything goes wrong later, or you want to try again with different settings, you can always start from it.
Upload the scan to a certificate restoration tool. Use one that separates stains from printed design and handwriting rather than applying a single filter across the whole image. That separation is what protects your signatures and typed text.
Review the signatures and seals in the result. Zoom in to at least 100 percent and compare the restored version with the original scan, side by side if you can. Check the ends of the pen strokes, the shading of the seal, the corners of the border and any faint typed characters. If anything looks thinner, blurred or missing, go back and adjust before you export.
Export a lossless PNG or TIFF for your records and a high-quality JPEG or PDF for printing. The lossless file is the one to archive, alongside the raw scan. The JPEG or PDF is the one to send to a print shop or share with family. Avoid saving the same JPEG over and over, as each save loses a little detail.
Mistakes to avoid
The single most important rule is this: never try to remove stains from the original certificate with water, bleach or erasers. It's tempting, especially when a stain looks like it might lift with a damp cloth, but most stain removal on paper is irreversible. Water can spread a tide line rather than remove it, and it can make ink run. Bleach weakens the paper fibres and can strip the colour out of printed areas and signatures along with the stain. Erasers scuff the surface of the paper, and on an old, fragile sheet they can tear it or rub away the very ink you're trying to protect. If the original genuinely needs physical treatment, that's a job for a professional paper conservator, not a kitchen table.
A few other mistakes come up again and again. Sticky tape is one of the worst, because the adhesive yellows over time and leaves a stain that is often harder to deal with than the tear it was meant to fix. Laminating an old certificate seals it inside plastic permanently, and it can't be safely undone. Leaving a document in a sunny window to "bleach out" stains fades the ink and the printing much faster than it fades the stain.
On the digital side, the common mistakes are scanning in greyscale, saving the scan as a heavily compressed JPEG, and trusting a restoration without zooming in to check it. Another is deleting the original scan once you have a restored version. Keep both. Storage is cheap, and the raw scan is the only digital record of what the certificate actually looked like.
Storing the original after restoration
Once you have a restored copy, the next job is to protect the original so it doesn't deteriorate any further. The digital restoration doesn't stop the paper ageing, and the same conditions that caused the damage in the first place will keep working on it if nothing changes.
Keep the certificate flat in an acid-free, lignin-free folder or archival sleeve. Ordinary card folders and envelopes contain acids that slowly migrate into the paper and speed up yellowing, which is exactly what you're trying to avoid. Don't fold it, roll it tightly or hold it with paper clips, staples or rubber bands, all of which leave their own marks over time. When you do handle it, make sure your hands are clean and dry, and hold it by the edges.
Store it away from light and away from damp rooms such as basements and attics. Basements tend to be humid, and attics swing between hot and cold through the year, and both are hard on paper. An interior cupboard or a drawer in a living area is usually far safer. Stable, moderate humidity is the best defence against new foxing and mould spots. A rough guide that conservators often use is to keep relative humidity somewhere around 35 to 50 percent and, above all, to avoid big swings. Mould becomes a real risk when the air stays above about 65 percent humidity for long periods, which is worth knowing if you live somewhere warm and humid. In that kind of climate, a sealed archival box with silica gel packets can help.
If you'd like to display the certificate, consider framing a print of the restored version and keeping the original in storage. If you do want the original on the wall, use acid-free mounting board and UV-filtering glass, and hang it on a wall that doesn't get direct sunlight.
Final thoughts
A stained certificate isn't a lost cause. In most cases, the damage that makes it look old and neglected, the water rings, the foxing and the yellowing, sits on top of a document that is still completely intact underneath. The signatures are still there, the seal is still there, and the printed design is still there. Good restoration is really about uncovering that, carefully, without changing any of the details that make the document meaningful.
The approach is simple to follow. Scan in colour at a high enough resolution, use a tool that can tell stains apart from ink and printing, check the result closely, and keep both the raw scan and the restored file. Then put the original somewhere cool, dry and dark, and let the restored copy do the work of being looked at.
If you have a certificate of your own that has suffered from damp storage, the first step costs nothing at all. Scan it in colour today, before the stains spread any further, and you'll have a safe digital record of it whatever you decide to do next.
Frequently asked questions
Can water stains be removed from a certificate?
Will the signatures and seals stay on the restored certificate?
Can I use a restored certificate as an official document?
Related restoration tools
- #certificates
- #stain removal
- #case study
- #foxing repair
- #document restoration
- #certificate restore
- #remove document stains

Written by
Thisara Jaso
Document restoration specialists
The Recovoly team builds AI tools that restore torn, faded and damaged documents - working with archivists, librarians, genealogists and families to recover records that would otherwise be lost.
